

My first guitar teacher was a super hero.
I would bring in a pile of CDs with my favourite songs on them, he would just listen to them and magically play what he was hearing.
I remember thinking no normal human being can do this, he must have possessed some secret super power that he was drawing upon to implant the music directly into his brain.
Now, many years later as I teach students of my own, I receive the same reaction from students when they ask me to learn and teach them a song that I’ve never heard before and can do so in the limited time of our lesson together.
But I can assure you, I definitely do not have any superpowers and even better, this is a skill that can be learned and developed by practicing the right techniques.
In this article on transcribing music I am going to show you exactly how to harness the “superpower” of transcribing music for yourself.
Improve your guitar playing by downloading a copy of my Free Guitar Practice Routine Checklist and Planning Guide.
Table Of Contents
- Why To Transcribe Music
- 3 Steps To Transcribing Music
- The Benefits of Transcribing Music From Other Instruments
- Imitation To Creation: A Cure For Writer’s Block
Why To Transcribe Music
One of the best ways to learn anything is to find yourself a mentor so you can tap into their mind and benefit from all of their years of experience, knowledge and wisdom.
This is what you are doing when transcribing music as you are essentially taking on the role of apprentice as you learn how to play music from the masters.
Learning from other musicians can help you grow as an artist by giving you new perspectives and insights on your instrument.
Perhaps you have a favourite musician or artist that makes you think, “Man, I wish I could sound like that.”
Learning how to play songs, licks, or phrases from your favourite artists will help you sound more like them by giving you the ability to use their musical ideas, or similar original ideas, in your own music.
Imitating your favourite artists can also inspire you to create your own original work; imitation leads to creation.
If you are trying to write or perform in a specific style of music, learning how to play songs in that style will help you get into the proper mindset.
If you play in a cover band and you need to learn songs for gigs, transcribing music allows you to learn any song you need to.
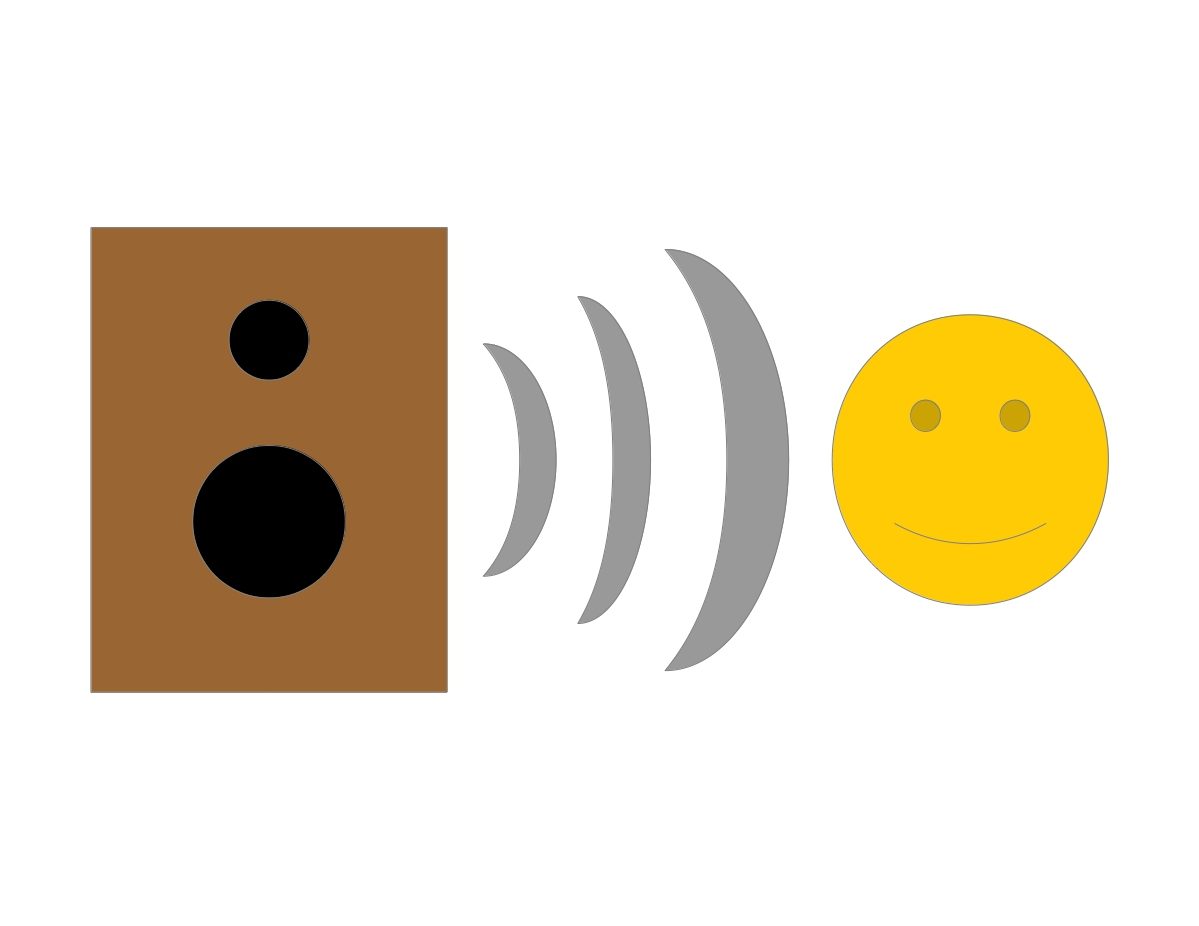
Transcribing music will also have a positive effect on your ears and how you hear music.
Ear training is important because it helps you translate the musical ideas and concepts you hear in your head into real sounds you can play on your instrument.
If you hear an inspiring lick, or want to learn a song that’s stuck in your head, being able to transcribe music means you can learn how to play it even if you don’t have the tabs or sheet music.
Now, there are plenty of programs for transcribing music, such as anthemscore, but by using one of these programs you will be missing out on all of the above benefits of transcribing music.
3 Steps To Transcribing Music
Outlined below are three in-depth steps for you to follow to help you learn and master the skill of transcribing music.
The three steps are as follows:
Each step will break down and take you through a simple arrangement of the traditional song “Auld Lang Syne” to help you develop your transcribing music superpower.
Step 1: Active Listening
Most people listen to music passively which means listening without paying too much attention to the music.
Another way of listening to music is called active listening which is when you are fully engaged and concentrating on the music to learn, memorize, study and analyze it.
As a warm up before getting into the finer details of transcribing music, I’ve outlined some steps below to help get you into the habit of active listening.
Listening Systems
The first thing to consider when listening to music actively is what type of system you will use to listen to the music.
For example, if you’re trying to transcribe a song by only listening to it when it comes on the radio this will obviously take a very long time.
The listening system you choose should have some basic features such as fast-forward/rewind, scrubbing capabilities, and the ability to pause and replay the music from specific points of time.
More advanced features include the ability to change the speed of the music without affecting its pitch or harmonic content and the ability to chop up and rearrange the piece of music so you can isolate specific parts.
A looping feature is also very useful as it allows you to listen to the part you’re trying to learn over and over without losing any time between plays, which might cause you to forget what you’ve just heard.
Some listening systems with the basic features you would need are:
-
CD Player
-
MP3 player (iPod or smartphone)
-
iTunes, Windows Media Player, or any other music player apps
Examples of more advanced listening systems with some very handy tools for transcribing music are:
-
Digital Audio Workstations (DAWs) such as Pro Tools, Audacity, GarageBand, Logic Pro or Steinberg Cubase
-
Transcription software such as Transcribe! by Seventhstring or TwelveKeys
When using one of the above listening systems it is important to consider whether you will use headphones or speakers to listen with.
The listening accuracy that you will be able to hear the music with depends on the quality of your speakers or headphones.
A pair of studio monitors will provide you with better accuracy than a pair of cheap computer speakers as a pair of good quality headphones will provide you with better accuracy than a pair of earbuds.
Headphones have an advantage over speakers in certain environments by blocking out more noise from your surroundings unless of course you have the resources to perform your transcribing in a quiet room or soundproofed studio.
Listening For Structure
The first thing you should actively listen for is the form or structure of the piece of music you are transcribing which includes the different parts of a song such as the verse, chorus, bridge, solo, etc.
If you are transcribing an instrumental solo within a larger piece of music then you may just be listening for the phrasing or structure of the solo.
The easiest way to start organizing the song by its structure is to label the different parts of a song with different letters or titles and each time that part of the song repeats you would use the same letter or title as the first time.
Listen to the audio of “Auld Lang Syne” and try to figure out the form of the song by labelling each separate part as either A, B, C, etc. or verse, chorus, bridge, etc.
Auld Lang Syne – Full Arrangement
Listening For Melody
The next step is to concentrate on the melody of the song which is the part of the music that is most memorable and tends to stay stuck in your head long after you’ve finished listening to the song.
Focus on when the melody seems to rise and fall, when it begins and ends for each part of the song, how long certain notes last and what instrument it is performed on.
Listen to the melody of the song you are transcribing over and over again and sing along with it until you can sing it back from memory all on your own.
Listen to the full arrangement of Auld Lang Syne again and this time try to focus on just the melody part which is played on the guitar.
To help you hear only the melody I’ve provided both the full arrangement and the isolated melody track and would recommend listening to the isolated melody and then the full arrangement to better distinguish the melody part.
Auld Lang Syne – Melody
Auld Lang Syne – Full Arrangement
Listening For Bass
After you’ve actively listened to the melody, listen to the song again but this time focus on just the bass line and the role it plays in the music.
Listen for how it relates to the melody and the other instruments in the song and for how long notes are held, when they are played and, if the song you’re learning has drums, how the bass line relates to the drum part.
Just as you did with the melody part, listen to the bass line over and over again until you can sing it back from memory without listening to the music.
Now try listening to the bass line in Auld Lang Syne by listening to the isolated bass track first and then the full arrangement to help you pick out the bass part.
Auld Lang Syne – Bass
Auld Lang Syne – Full Arrangement
Listening For Other Instruments
Continue listening to the song like this until you have listened to all of the different instruments and can sing their parts back from memory.
Remember to compare how each instrument part fits with the melody and the other parts of the song and try to figure out what role that part serves in the overall structure of the song.
This arrangement of Auld Lang Syne uses only guitar, piano and bass so take a listen to the isolated piano track and then listen to the full arrangement to see how the piano works with the other instruments.
Auld Lang Syne – Piano
Auld Lang Syne – Full Arrangement
Listening For The Time Signature and Tempo
Now listen for the tempo of the music until you are able to tap along, clap or bob your head to it at a steady pace.
As soon as you can confidently tap out the song’s tempo, use a metronome with a tap feature to find out what the tempo, measured in beats per minute (BPM), of the song is.
To figure out the time signature, listen for how the beats are organized and try to hear a repeating set of the same number of beats as each set of beats is the length of one measure in the song.
Now count how many measures make up each part of the song.
Listen to the full arrangement of Auld Lang Syne and see if you can figure out the tempo and time signature on your own and then listen to the full arrangement with the click track to see how you did.
The beginning of each measure has an accented click to let you know when it starts.
Auld Lang Syne – Full Arrangement
Auld Lang Syne – Full Arrangement With Click
Listening For Chord Changes
The next thing to actively listen for is when the chord changes happen by first listening for how many chords are in each part of the song, such as how many chords are in the verse, chorus, etc, and for how long each chord lasts.
The important thing to do here is to try and recognize when the chord changes happen, not necessarily what the chords are being played.
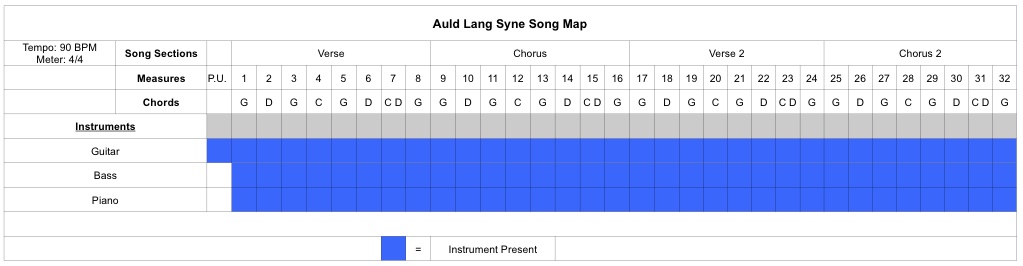
Map Chord Changes Over The Form Of The Song
To help keep track of your active listening of the song you might find it useful to map out all of the information you’ve acquired so far.
To map out the song get a piece of paper and write out the form of the song first and then for each part of the song draw out the number of measures and when the chord changes happen and be sure to note the tempo and time signature as well.
A basic song map might look like this:
Auld Lang Syne Song Map
Step 2: Translating The Music
Now that you’ve warmed up to the song with the previous listening activities it’s time to start looking at how to actually learn the music you’re hearing.
The ability to translate the music you’re trying to learn involves something called relative pitch, as opposed to “perfect pitch”, which is the ability to recognize the notes you’re hearing compared to, or relative to, other notes.
Perfect pitch is the ability to recognize notes on their own without the context of other notes to compare to and is not a necessary skill to obtain for transcribing music.
The focus of this next step for transcribing music will be in helping you to develop your ability to use relative pitch to understand and learn the music you’re transcribing.
Developing Tonal Memory
Being able to translate what you hear into notes you can play involves using your tonal memory which is the ability to hear a note and then reproduce that same note on your instrument.
To help you develop your tonal memory try this exercise:
-
Listen to a given note
-
Wait a small period of time
-
Try to reproduce that note
Repeat this exercise but gradually increase the time between when the note sounds and when you try to reproduce it.
Below are five different notes to try out this exercise.
Notes For Practicing Tonal Memory
The next thing to try is reproducing single notes from a given melody.
Listen to the melody for Auld Lang Syne below and try to pick out single notes to try and reproduce on your instrument.
It might be a good idea to start with the first note and then the final note in the melody or to go one note at a time, pausing the track after each note to give you time to figure out what it is.
Auld Lang Syne – Melody
Recognizing Intervals
After you’re comfortable reproducing single notes by ear the next step is to do two notes or musical intervals.
The best way to start recognizing intervals is to sit at your instrument and play through all of them, from a minor 2nd to an octave, until you can sing them back from memory.
To help you out I’ve provided audio below for each interval with the root note C.
half step; C – Db (minor 2nd)
whole step; C – D (major 2nd)
C- Eb (minor 3rd)
C – E (major 3rd)
C – F (perfect 4th)
tritone; C – F# (augmented 4th); C – Gb (diminished 5th)
C – G (perfect 5th)
C – Ab (minor 6th)
C – A (major 6th)
C- Bb (minor 7th)
C – B (major 7th)
C- C (octave)
Listen to the interval, try to play it on your instrument and then, just as above, try to figure out two adjacent notes from a melody.
It will help if you first focus on the relative tonal distance between the two melody notes, far apart or close together, to narrow your choices.
Now listen to the melody for Auld Lang Syne and try to reproduce any two adjacent notes on your instrument.
Auld Lang Syne – Melody
Figuring Out The Rhythm
Before figuring out the notes of the melody you should figure out the rhythm of the melody.
If you’ve actively listened to the song then you should know the time signature and how the measures are divided up.
Starting with the first measure of the melody, try and tap out it’s rhythm and repeat until you can tap it out from memory.
Next, focus on just the second measure and try tapping out the rhythm of the melody until you can tap it out from memory.
Continue doing this through the rest of the song until you can tap out the rhythm for the entire melody.
It might help to break up the melody into it’s different sections such as verse, chorus, bridge, etc. and figure out the rhythm for each separate part.
Count how many measures long each part of the melody is.
Listen to Auld Lang Syne and try tapping out the melody’s rhythm by following the previous steps.
Auld Lang Syne – Melody
Auld Lang Syne – Full Arrangement
Figuring Out The Melody
If you’ve followed the previous steps then you should now have the melody’s rhythm figured out and sectioned off into different parts or phrases.
Using your tonal memory, listen and try to reproduce the first and last notes of each part.
If it makes it easier you can divide each part up into smaller phrases such as ascending runs, descending runs or by sectioning it off anywhere there are distinct pauses in the melody.
After you’ve figured out the first and last notes of each phrase the goal is to connect the dots between these notes.
Listen for whether the melody travels higher or lower and continue to connect the dots until you’ve reached the final note of each phrase.
When you’ve finished one phrase repeat it until you can play it back from memory and then move on to the next phrase.
When you have two phrases or parts figured out connect these two parts together and repeat them until you can play them back from memory.
Continue doing this until you have the whole melody figured out by ear.
Listen to the melody of Auld Lang Syne and follow the previous steps to try and figure it out with your ears.
Auld Lang Syne – Melody
Auld Lang Syne – Full Arrangement
Determining The Key
Now that you’ve figured out how to play the entire melody by ear it’s a good idea to determine what key the melody is being performed in as this can limit the notes you might have to figure out.
Take a look at all the notes in the melody by writing them all down on a piece of paper.
First start by ruling out any keys with notes that don’t belong and then determine what keys are left that include all the notes of the melody.
Listen to or play the melody and try to decide on what the root note is by listening for what note the melody resolves on.
If the note the melody resolves on matches one of the keys that includes all of the melody notes this is probably the key the melody was written in.
You can also test whether you have the correct key by playing the major scale over the song and listening to make sure the notes fit.
Note that it may be difficult to determine the key this way for some songs as the melody may contain accidentals or travel through different keys.
Determining The Chords
The last part of the song to translate is the chord progression.
To start, if you’ve figured out the key of the song, write down all of the basic chords in that key to give you a list of options to choose from.
To get your first clue as to what chords are being played, listen to what notes the bass is playing as the bass part commonly plays the root notes of each chord.
After you’ve determined what notes the bass is playing, listen for what type of chord is being played, such as major or minor, and try out some of these different chord types from your list of chord options.
Next, listen for whether the chord has some colour added to it from including notes outside of the basic triad such as 7ths, 6ths, 9ths, etc.
Do this for each chord in the song until you’ve figured out each chord of the chord progression by ear.
Obviously the previous steps will be much easier the better you can recognize your different chord types.
I would recommend spending some time listening for the sound or mood of different types of chords such as major, minor, suspended, diminished, augmented, etc.
Below are examples of some common types of chords for you to listen to, each built one note at a time and then finished off with a final strum of the chord and all with the root note C.
C
Cm
C7
Csus2
Csus4
CMaj7
Cmin7
Cmin7b5
Cdim
Caug
Try and figure out the chords to Auld Lang Syne by listening to the isolated piano track, the track with only piano and bass, and the full arrangement.
Auld Lang Syne – Piano
Auld Lang Syne – Piano and Bass
Auld Lang Syne – Full Arrangement
Translating Tips
Below are some tips you might find useful for translating what you’re hearing:
-
-
-
Listen at slower speeds
-
Try not to listen past the last note of the section you’re translating as this could affect your tonal memory
-
If using a DAW, cut out the section or phrase you’re translating so you can listen to just that part with no interference from notes coming before or after; this ties in with the previous point
-
If possible, try to isolate the part you’re translating by using EQ, panning, or even soloing audio tracks
-
-
Step 3: Documenting The Music
Ways To Document The Transcription
After you’ve translated the music you’re hearing with your ears to something you can play with your fingers the next step is to put it down into some kind of documented form.
There are many different forms and methods of documentation you can use.
The first way to document the music you’ve just transcribed is to do something you’ve probably already done – memorize it.
Even if you don’t document the transcribed music using a more permanent method, just committing it to memory allows you to play, perform and think about it.
Another means of documenting the transcribed music is to capture an audio recording of you playing it on your instrument.
This will allow you to listen back to your transcription to ensure that you’ve translated the music accurately.
You can also notate the transcription by writing out the notes of the melody on staff paper with the chords written above.
If you’ve transcribed a guitar part you can follow the previous step except use guitar tablature instead of writing out the notes on the staff.
You can make a simple chord chart as well to document the chord progression of a song you’ve transcribed.
Why Document The Transcription
The first and most obvious reason to document your transcribed music is so you don’t forget the music you’ve just worked so hard to figure out.
Though there might be benefits to transcribing music you’ve already figured out, it would be a shame to waste time and energy repeating the same song when you can move on to other songs you’d like to learn.
Another reason to write down or document the transcription is so you can take a step back to analyze the music.
One of the main benefits of transcribing music is that you gain access into the minds of some of your favourite musicians.
By writing out the transcribed music you can better find patterns, devices and musical concepts these artists have used in their playing or writing by gaining a bird’s eye view of the entire piece.
If you need to transpose the music to a different key it might be easier to do if you have all the notes and chords written out to easily see what the new notes and chords will be in the new key.
Also, having a documented version of the transcription allows you to file it or store it somewhere for future use such as the need to relearn it for performance or creative purposes.
The Benefits Of Transcribing Music From Other Instruments
Another reason for transcribing music is the opportunity to learn music that was written or performed on other instruments than your instrument of choice.
One benefit is the development of new techniques that are more common on one instrument over another.
The very nature and physical design of some instruments makes certain elements of music more common on those instruments.
For example, a certain chord pattern might be developed on a guitar because of the ease with which you can play movable chord shapes.
This chord pattern might be overlooked if you were writing on a keyboard, so by transcribing a guitar part on a piano you gain insight into how a guitarist sees chords and chord progressions.
You can then apply this way of thinking to your piano playing and open up a world of new possibilities on your instrument.
Another benefit of transcribing music from different instruments is the ear training you will get from focusing on different sounds.
If you’re a guitar player you’re probably more likely to hear guitar parts easier than other instruments as this is what you’re usually listening for and focusing on.
By transcribing music on an instrument other than, say, a guitar, you are forced to focus on how the same pitches sound on another instrument, such as a trumpet.
This difference in sound is called timbre and by transcribing music of a different timbre you will develop more precise listening skills.
Imitation To Creation: A Cure For Writer’s Block
I believe the number one cure for writer’s block is to learn new songs and altering a piece of transcribed music is a great starting ground for developing new music.
I am not talking about stealing or plagiarizing other’s music but letting the music of others inspire you to create your own.
One of the key reasons to transcribe music is that it can lead you into new areas of creation and expression in your own music.
It can be something as simple as discovering a chord you’ve never used before, or hearing notes in a melody that lead to a completely new and original melody of your own.
Sometimes these ideas don’t just pop into your head so below I’ll describe some steps you can take to harness the inspiration.
One of the first things you can do to get your creative juices flowing is transpose the piece of music you’ve transcribed into a new key.
Playing a piece of music in a new key can lead you to discover new patterns and shapes you might not have seen in the original key because of the physical layout of the notes on the instrument.
Another technique for developing a foundation for original music is to start substituting out different musical elements.
You can substitute out different chords from the chord progression, try using the scale degrees of the original melody with a different scale, or change the timing of different melodic phrases.
You can vary the rhythm of certain parts such as changing the strum pattern of a guitar part or even using the strum pattern of a guitar part you’ve transcribed with a different chord progression.
You can also borrow broader ideas from the transcribed music such as specific scales that were used to write the melody or the tempo and meter that the song was performed at.
Conclusion
I hope you’ve come to realize that transcribing music and learning songs by ear is actually not some superpower that you have to be born with but is an incredibly useful skill that you can attain with practice and hard work.
That said, it’s probably not a skill that you will learn in a day so my best advice would be to start developing your ears as soon as possible!
By implementing ear training into your daily practice routine you will start to gain the ability and the benefits of transcribing music and will soon experience the beauty and joy of a truly musical mind!
No Comments